It could have been our lack of enthusiasm for the rice cereal, or it could have been that it tastes awful to out daughter, either way the rice cereal was a complete whammy at our house. We did, however, find some things that she simply adores!
I never though I would be so very excited to make baby food for our daughter. We knew from the beginning that we were going to, I just never though I'd find so much joy in it. Though watching Little Bean eat the things she likes is adorable and makes my heart flutter. Even better is watching her tell us she dislikes something.
At 7 months she is very adamant on the flavors she is not so fond of. For instance she could not get enough of the avocado and banana Hubby made for her the other day. She slurped it off of the spoon and kept practically begging for more. It was not the same experience with peas and carrots. She tried one bite (which she was so very excited to get in her mouth) and instantly spit it back out! Then she tucked her chin to her chest, wouldn't look at either of us and refused to open her mouth for more. I caved after trying to coax her for 5 more minutes and gave her some butternut squash with pears - which she loves!
The next concoction will be something with apples in it. We've got a few that are in need of using before they are no longer good to eat. I'm thinking of putting them with some pumpkin because we know she really likes that already. Plus it is fall and those two are made for each other!
Prior to our baby-food-making experience we searched the internet for tips and hints on the basics. What to put together. How to prepare the food so it is safe. How long to store the food. How to properly store the food. Then we realized if we're feeding her what we are eating we do it all the same! It was like some sort of epiphany!
Here's what we do to make our baby food:
1.) Cook anything to the normal specifications. Examples: I boiled 2 cups of fresh carrots until they were soft. I boiled peas until they were the temperature we would normally eat them at. Fruits I left raw because that's how we eat them. We have not yet introduced meats. When we do I'll post about it.
2.) Put the cooked or raw food in to the food processor or blender. *I feel a disclaimer is needed here. There are a few very cute baby food machines on the market. They are expensive and come with many, many pieces. We use our food processor (which we already owned) or a blender (which we already owned). Either has work perfectly and I know you can get regular blenders for less than those fancy pants baby blenders.*
3.) Push that button until your baby food is mashed sufficiently! That's right. Make it good and mushy. We discovered our daughter does not currently like the chunks so we just make sure that there aren't any. Once we reach that point it is blended well enough for us.
4.) Scoop the baby food in to ice cube trays and freeze. Once frozen remove from the ice cube tray, put in to a storage container of your choice and label when you made it so there are no questions. For us plastic freezer bags work perfect. I can write on them what is inside and the date.
5.) When it is time for baby to eat thaw a cube or two. Stir and serve. Baby will thank you for putting in so much effort and for making such good food for them! We take out some cubes in the morning which allows them to thaw in time for lunch and dinner. I warm her food to just above room temperature that way it isn't cold. We've saved money, time and effort since we're just making extras when we cook for us!
Have you got any other tips or tricks you'd like to add? Please share!
Here are the combinations that we have tried. I'll make a separate post about all of them later so it will be a quick resource for anyone interested. If you add any combinations I'll put them on, too (just leave your name and/or link so I can give you credit!!)
1/2 of an Avocado + 1 Banana (made about 6 ounces, not an ice cube tray full)
1.5 cups Peas + 2 cups Carrots (made more than an ice cube tray full)
1 Avocado + 1 Pear
2 cups Butternut Squash + 1 Pear
Have you got any great combinations to share? Please do! Don't forget to leave your name so I can give you credit!
Happy baby-food-making!
Showing posts with label Recipes. Show all posts
Showing posts with label Recipes. Show all posts
Tuesday, October 2, 2012

Monday, September 10, 2012
Summer Strawberry Coconut Cake
In order to use up the remaining strawberries (from the icebox cake on my last Pinterest post) I searched for a cake that had them specifically. I love fruity things and I am cuckoo for coconut! Fruity candle scents. Fruity salads. Fruity and coconutty cake? Yes, Please!

Here is the original post if you'd like to check it out:
Summer Strawberry Coconut Cake
Here is the link to the actual recipe (it is not on the original post):
Summer Strawberry Coconut Cake
Ingredients:
Cake:
1 (18.5 ounce) box white cake mix
4 T. strawberry gelatin powder
2 T. all-purpose flour
1 t. baking powder
2 T. granulated sugar
3/4 cup vegetable oil
4 eggs
1/4 c. water
1/2 c. pureed strawberries
1 t. vanilla
1/2 t. coconut extract
1/2 cup fresh strawberries, finely diced
1 c. coconut, finely shredded in food processor
several strawberries to fill cake and garnish
Icing:
8 ounces cream cheese, softened
2 sticks (1 cup) butter, softened
2 16-oz. boxes powdered sugar
1 teaspoon vanilla extract
Directions:
Preheat the oven to 350 degrees F.
Combine dry ingredients in mixer bowl and stir together. Beat in oil, eggs, water, strawberry puree, vanilla, and coconut extract. Mix well. Stir in diced strawberries and coconut. Pour into two 8- or 9-inch round pans, greased and floured. Bake for 25-35 minutes, or until a tooth pick inserted into the center of the cakes comes out clean and the cakes are pulling away from the sides of the pans.
Put pans on wire racks and cool for 10 minutes. Remove from pans and leave on racks to cool completely. While cooling, make icing.
Icing: Beat butter and cream cheese until smooth. Add vanilla. Slowly beat in powdered sugar until desired consistency. Add a tablespoon or so of milk if icing is too thick.
Spread some icing on first layer, then top with sliced strawberries. Place second layer on top and ice the rest of the cake. Cover entire cake in shredded coconut and garnish with fresh strawberries.
Cost for ingredients we did not have on hand:
Box of white cake mix: $1.98
Strawberry J-ello: $.68
Coconut Extract: $3.56
Shredded Coconut: $1.28
Total: $7.50
Total prep, mixing, and baking, cooling and decorating time: 1 hour 45 minutes
As you will see in the pictures I cut the recipe in half. I didn't see the need for Hubby and I to eat another entire double layer cake ourselves! It worked out perfectly (though for some recipes this is not possible). Our cake was sort of short, but super cute!
I diced the strawberries in the food processor, so they were a little more wet than they would have been if done by hand. However, they worked out perfect.
Since I cut the recipe in half I had some leftover J-ello. I added in the rest of the leftover strawberries, a little water and refrigerated. We had some good fruity J-ello to enjoy as well! (Now, if I could just figure out what to do with that extra cake mix...)
Here are photos documenting the process:


Taste and evaluation:
This is one of the most refreshing cakes I have ever tasted! It is so light and full of flavor. We kept the cake in the refrigerator so it was quite chilled when we ate it. I think it added to the enjoyment to have our cake cold. It is a perfect summer cake - very refreshing! I was pleasantly surprised that the strawberries did not overpower the coconut. I was worried since there were so many berries. The coconut added a soft tone to the strawberries and really complimented them well.
Overall:
This is going to be in my permanent collection of cakes to make! This recipe was very simple to follow and the ingredients were easy to find. I am very pleased at how beautiful the cake turned out! The pink is so vibrant! This would be a perfect 4th of July cake as well as a little girl's birthday party. I would be willing to guess that you could change the strawberries for raspberries, but don't hold me to it (I'll try later and let you know). I give this recipe and it's creator kudos for a job well done!

Here is the original post if you'd like to check it out:
Summer Strawberry Coconut Cake
Here is the link to the actual recipe (it is not on the original post):
Summer Strawberry Coconut Cake
Ingredients:
Cake:
1 (18.5 ounce) box white cake mix
4 T. strawberry gelatin powder
2 T. all-purpose flour
1 t. baking powder
2 T. granulated sugar
3/4 cup vegetable oil
4 eggs
1/4 c. water
1/2 c. pureed strawberries
1 t. vanilla
1/2 t. coconut extract
1/2 cup fresh strawberries, finely diced
1 c. coconut, finely shredded in food processor
several strawberries to fill cake and garnish
Icing:
8 ounces cream cheese, softened
2 sticks (1 cup) butter, softened
2 16-oz. boxes powdered sugar
1 teaspoon vanilla extract
Directions:
Preheat the oven to 350 degrees F.
Combine dry ingredients in mixer bowl and stir together. Beat in oil, eggs, water, strawberry puree, vanilla, and coconut extract. Mix well. Stir in diced strawberries and coconut. Pour into two 8- or 9-inch round pans, greased and floured. Bake for 25-35 minutes, or until a tooth pick inserted into the center of the cakes comes out clean and the cakes are pulling away from the sides of the pans.
Put pans on wire racks and cool for 10 minutes. Remove from pans and leave on racks to cool completely. While cooling, make icing.
Icing: Beat butter and cream cheese until smooth. Add vanilla. Slowly beat in powdered sugar until desired consistency. Add a tablespoon or so of milk if icing is too thick.
Spread some icing on first layer, then top with sliced strawberries. Place second layer on top and ice the rest of the cake. Cover entire cake in shredded coconut and garnish with fresh strawberries.
Cost for ingredients we did not have on hand:
Box of white cake mix: $1.98
Strawberry J-ello: $.68
Coconut Extract: $3.56
Shredded Coconut: $1.28
Total: $7.50
Total prep, mixing, and baking, cooling and decorating time: 1 hour 45 minutes
As you will see in the pictures I cut the recipe in half. I didn't see the need for Hubby and I to eat another entire double layer cake ourselves! It worked out perfectly (though for some recipes this is not possible). Our cake was sort of short, but super cute!
I diced the strawberries in the food processor, so they were a little more wet than they would have been if done by hand. However, they worked out perfect.
Since I cut the recipe in half I had some leftover J-ello. I added in the rest of the leftover strawberries, a little water and refrigerated. We had some good fruity J-ello to enjoy as well! (Now, if I could just figure out what to do with that extra cake mix...)
Here are photos documenting the process:


Taste and evaluation:
This is one of the most refreshing cakes I have ever tasted! It is so light and full of flavor. We kept the cake in the refrigerator so it was quite chilled when we ate it. I think it added to the enjoyment to have our cake cold. It is a perfect summer cake - very refreshing! I was pleasantly surprised that the strawberries did not overpower the coconut. I was worried since there were so many berries. The coconut added a soft tone to the strawberries and really complimented them well.
Overall:
This is going to be in my permanent collection of cakes to make! This recipe was very simple to follow and the ingredients were easy to find. I am very pleased at how beautiful the cake turned out! The pink is so vibrant! This would be a perfect 4th of July cake as well as a little girl's birthday party. I would be willing to guess that you could change the strawberries for raspberries, but don't hold me to it (I'll try later and let you know). I give this recipe and it's creator kudos for a job well done!
Wednesday, August 29, 2012
Strawberry Crunch Icebox Cake
I have been seeing these pop up all over Pinterest, so I thought I'd give it a try.

Here is the original post if you'd like to check it out:
Strawberry Crunch Icebox Cake
Here is the link to the recipe (it is not on the original post):
Strawberry Icebox Cake Recipe
Ingredients:
1 box Nature Valley Granola Bars
1/3 cup brown sugar
1 cup flour
2 tablespoons melted butter
2 egg whites
1/2 cup sugar
1 cup heavy whipping cream
1 lemon
4 ounces cream cheese
1 1/2 cups freshly chopped strawberries
Directions:
Put the Nature Valley granola bars in a food processor and process until you achieve a course crumb. In a large bowl, add the crumbs, brown sugar, flour and melted butter and mix together. Then spread into an 8x8" pan that has been covered with parchment paper. Bake at 350 degrees for 20 minutes. Let cool. Then divide in half and set aside. In a mixing bowl, combine eggs whites and sugar and mix on high. Add the heavy cream and continue mixing for another five minutes. Continue to add the fresh squeezed lemon juice and softened cream cheese. Mix on low speed until incorporated. Fold the fresh strawberries into the cream mixture. In a buttered glass cake pan, press half of the crumb crust mixture on the bottom. Top with strawberry mix and then add the remaining crumbs to the top. Cover and freeze for three hours or more and enjoy!
Cost for ingredients we did not have on hand:
Nature Valley Granola Bars: $2.98
Heavy Whipping Cream: $1.98
Total: $4.96
Total prep, mixing, and freezing time: 35 minutes + 5 hours to freeze
I did not chop the strawberries, instead I put them in the food processor so they were a little more squishy for me. I think it worked awesome and took less time than hand chopping them.
I also did not use parchment paper. We have wax paper on hand and it does the same thing for this process as the parchment paper would have. But, considering the crumbs stayed super crumbly I don't know that you'd need a liner at all. Use one though - just in case!
Here are photos documenting the process:


Taste and evaluation:
This is a very light and summery flavored cake. So refreshing that it is cold! We ate it out of the freezer the first time, but after that we cut small pieces and put them in the fridge for about an hour to soften them up. I liked the very subtle flavor the lemon added to the cake. The amount of available crumb for the crust was almost a perfect fit.
Overall:
Though this cake was quite tasty I do have to point out that the crumbs did not solidify at all for me. I'm not sure if more butter should be added to half of the mixture and the bottom layer be baked separate so that it hardens in to a crust or if there is another alternative. The bottom for me stayed crumbly, which made a mess getting it out of the pan and usually meant that they weren't any left on the filling by the time it got to my mouth. I would have preferred it to have been solid so when you take a bite with your fork it doesn't fall apart. The crumbs on the top of the cake were great and seemed to be just the right consistency. This is the only thing I would change when making it in the future.
I could see adding any kind of berry or fruit to this recipe. I will try it later on (with a different bottom layer) and let you know how it turns out!
This recipe is so super easy I would let kids help. It would be fun for them to break up the granola bars, stir in the strawberries and put it all together.

Here is the original post if you'd like to check it out:
Strawberry Crunch Icebox Cake
Here is the link to the recipe (it is not on the original post):
Strawberry Icebox Cake Recipe
Ingredients:
1 box Nature Valley Granola Bars
1/3 cup brown sugar
1 cup flour
2 tablespoons melted butter
2 egg whites
1/2 cup sugar
1 cup heavy whipping cream
1 lemon
4 ounces cream cheese
1 1/2 cups freshly chopped strawberries
Directions:
Put the Nature Valley granola bars in a food processor and process until you achieve a course crumb. In a large bowl, add the crumbs, brown sugar, flour and melted butter and mix together. Then spread into an 8x8" pan that has been covered with parchment paper. Bake at 350 degrees for 20 minutes. Let cool. Then divide in half and set aside. In a mixing bowl, combine eggs whites and sugar and mix on high. Add the heavy cream and continue mixing for another five minutes. Continue to add the fresh squeezed lemon juice and softened cream cheese. Mix on low speed until incorporated. Fold the fresh strawberries into the cream mixture. In a buttered glass cake pan, press half of the crumb crust mixture on the bottom. Top with strawberry mix and then add the remaining crumbs to the top. Cover and freeze for three hours or more and enjoy!
Cost for ingredients we did not have on hand:
Nature Valley Granola Bars: $2.98
Heavy Whipping Cream: $1.98
Total: $4.96
Total prep, mixing, and freezing time: 35 minutes + 5 hours to freeze
I did not chop the strawberries, instead I put them in the food processor so they were a little more squishy for me. I think it worked awesome and took less time than hand chopping them.
I also did not use parchment paper. We have wax paper on hand and it does the same thing for this process as the parchment paper would have. But, considering the crumbs stayed super crumbly I don't know that you'd need a liner at all. Use one though - just in case!
Here are photos documenting the process:


Taste and evaluation:
This is a very light and summery flavored cake. So refreshing that it is cold! We ate it out of the freezer the first time, but after that we cut small pieces and put them in the fridge for about an hour to soften them up. I liked the very subtle flavor the lemon added to the cake. The amount of available crumb for the crust was almost a perfect fit.
Overall:
Though this cake was quite tasty I do have to point out that the crumbs did not solidify at all for me. I'm not sure if more butter should be added to half of the mixture and the bottom layer be baked separate so that it hardens in to a crust or if there is another alternative. The bottom for me stayed crumbly, which made a mess getting it out of the pan and usually meant that they weren't any left on the filling by the time it got to my mouth. I would have preferred it to have been solid so when you take a bite with your fork it doesn't fall apart. The crumbs on the top of the cake were great and seemed to be just the right consistency. This is the only thing I would change when making it in the future.
I could see adding any kind of berry or fruit to this recipe. I will try it later on (with a different bottom layer) and let you know how it turns out!
This recipe is so super easy I would let kids help. It would be fun for them to break up the granola bars, stir in the strawberries and put it all together.
Sunday, August 19, 2012
Peanut Butter Eclair Cake
Since our kitchen was dismantled while my Husband laid down our amazing tile floor I had to opt for a non-cooked dessert this week. We both love anything involving chocolate and peanut butter so the Peanut Butter Eclair Cake from Plain Chicken fit our desires perfectly!

Here's the original post if you'd like to check it out:
Plain Chicken: Peanut Butter Eclair Cake
The recipe is so simple and very low cost!
Ingredients:
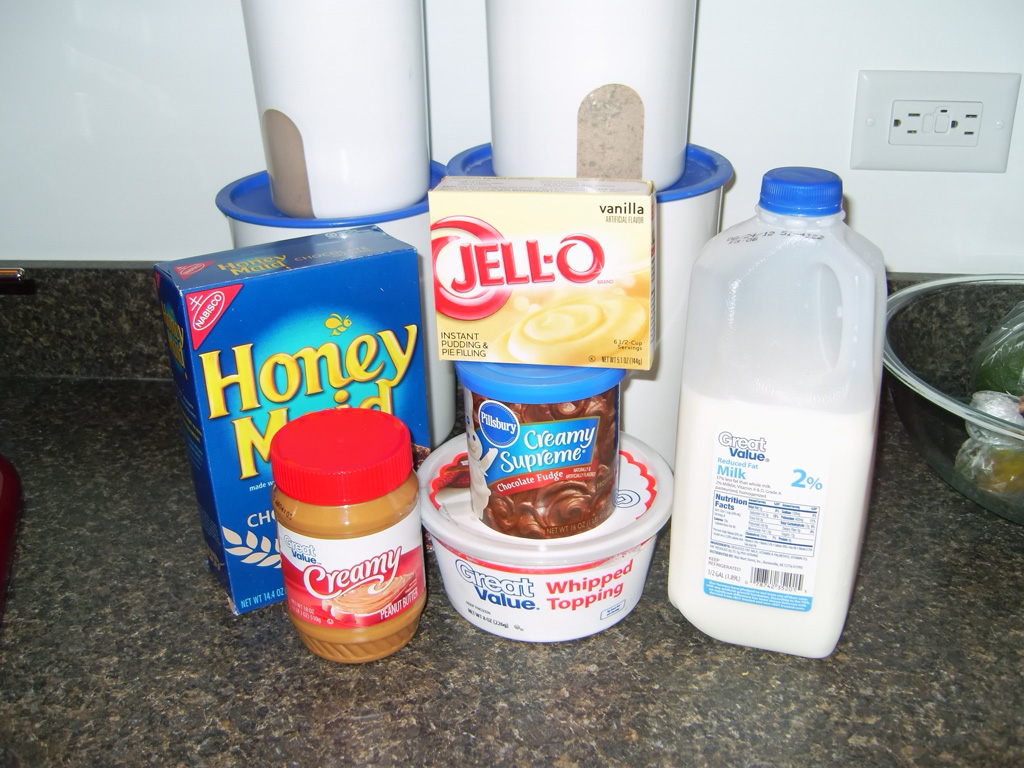
1 box chocolate graham crackers (there will be a few graham crackers left over)
2 (3 1/4-ounce) boxes vanilla instant pudding
1 cup peanut butter
3 1/2 cups milk
1 (8-ounce) container Cool Whip, thawed
1 can chocolate frosting
Directions:
Spray the bottom of a 9x13 pan with cooking spray. Line the bottom of the pan with whole graham crackers. In bowl of an electric mixer, mix pudding with milk and peanut butter; beat at medium speed for 2 minutes. Fold in whipped topping. Pour half the pudding mixture over graham crackers. Place another layer of whole graham crackers on top of pudding layer. Pour over remaining half of pudding mixture and cover with another layer of graham crackers.
Heat the container of prepared frosting, uncovered in the microwave for 1 minute. Pour over the top of the cake. Refrigerate for at least 12 hours before serving.
Cost for ingredients we did not have on hand:
Chocolate Graham Crackers: $2.58
Creamy Peanut Butter: $2.98
Vanilla Pudding: $1.18
Chocolate Frosting: $1.28
Whipped Topping: $1.98
Total: $10.00
Total prep, mixing, and time: 25 minutes
Our daughter did not take as long of a nap as usual so I had an assistant making this cake. I bundled her up in the Moby and let her help me make a mess in the kitchen. This recipe was super easy. I love that only two things need to be measured.
I did two things the differently on this recipe. We do not use cooking spray so I substituted by coating the bottom with a very thin layer of Crisco. We also do not have a microwave so I melted the icing in a pan in the toaster oven (the regular stove was unplugged and in the dining room during our renovation). It worked out perfect!

Here are photos documenting the process:


Taste and evaluation:
Again, my Husband will be helping to evaluate.
My Husband: This particular dessert was delightfully scrumptious!! Initial impression was that it would be likened to the ordinary "Graham cracker crust, Jello pudding filled" pie. That certainly is not the case. The multiple layers give the cake a solidarity that is missing from a lot of pudding filled desserts. The combination of flavors is exquisite. The peanut butter is present, but not overpowering, and the cool whip lends it's fluffy texture well to the entire dessert. This dessert must be served to a group of people though to avoid devouring the entire dish by one's self.
Me: I adore how simple this recipe is and how tasty is was! The cake was fluffy, but sweet enough that I couldn't eat too much at once. The peanut butter was so subtle in this dish. It was amazing how the ingredients complimented each other. This would be the perfect picnic treat!
Overall:
This recipe is a keeper! I could easily whip this dish up in a very short period of time for any type of event. I love how inexpensive it is and how many it would actually serve for the cost. I definitely recommend the Plain Chicken's Peanut Butter Eclair Cake!

Here's the original post if you'd like to check it out:
Plain Chicken: Peanut Butter Eclair Cake
The recipe is so simple and very low cost!
Ingredients:
1 box chocolate graham crackers (there will be a few graham crackers left over)
2 (3 1/4-ounce) boxes vanilla instant pudding
1 cup peanut butter
3 1/2 cups milk
1 (8-ounce) container Cool Whip, thawed
1 can chocolate frosting
Directions:
Spray the bottom of a 9x13 pan with cooking spray. Line the bottom of the pan with whole graham crackers. In bowl of an electric mixer, mix pudding with milk and peanut butter; beat at medium speed for 2 minutes. Fold in whipped topping. Pour half the pudding mixture over graham crackers. Place another layer of whole graham crackers on top of pudding layer. Pour over remaining half of pudding mixture and cover with another layer of graham crackers.
Heat the container of prepared frosting, uncovered in the microwave for 1 minute. Pour over the top of the cake. Refrigerate for at least 12 hours before serving.
Cost for ingredients we did not have on hand:
Chocolate Graham Crackers: $2.58
Creamy Peanut Butter: $2.98
Vanilla Pudding: $1.18
Chocolate Frosting: $1.28
Whipped Topping: $1.98
Total: $10.00
Total prep, mixing, and time: 25 minutes
Our daughter did not take as long of a nap as usual so I had an assistant making this cake. I bundled her up in the Moby and let her help me make a mess in the kitchen. This recipe was super easy. I love that only two things need to be measured.
I did two things the differently on this recipe. We do not use cooking spray so I substituted by coating the bottom with a very thin layer of Crisco. We also do not have a microwave so I melted the icing in a pan in the toaster oven (the regular stove was unplugged and in the dining room during our renovation). It worked out perfect!

Here are photos documenting the process:


Taste and evaluation:
Again, my Husband will be helping to evaluate.
My Husband: This particular dessert was delightfully scrumptious!! Initial impression was that it would be likened to the ordinary "Graham cracker crust, Jello pudding filled" pie. That certainly is not the case. The multiple layers give the cake a solidarity that is missing from a lot of pudding filled desserts. The combination of flavors is exquisite. The peanut butter is present, but not overpowering, and the cool whip lends it's fluffy texture well to the entire dessert. This dessert must be served to a group of people though to avoid devouring the entire dish by one's self.
Me: I adore how simple this recipe is and how tasty is was! The cake was fluffy, but sweet enough that I couldn't eat too much at once. The peanut butter was so subtle in this dish. It was amazing how the ingredients complimented each other. This would be the perfect picnic treat!
Overall:
This recipe is a keeper! I could easily whip this dish up in a very short period of time for any type of event. I love how inexpensive it is and how many it would actually serve for the cost. I definitely recommend the Plain Chicken's Peanut Butter Eclair Cake!
Sunday, August 5, 2012
Rootbeer Float Cookies
Here it is! My first Pinterest review. What better way to start than with something that sounds like it's too good to be true?!?!

Here's the original post if you'd like to check it out:
The recipe is a pretty straight forward cookie and icing combination.
Cookie Ingredients:


My Husband: I do not feel that the icing compliments the cookie very well. Depending on how the cookie is eaten (icing to the tongue or vice versa) one always overpowers the other. I also feel that the icing required for this type of cookie should be a much creamier type of icing, more similar to a cake frosting. The Confectioner sugar icing can feel somewhat gritty at times, and overpowered the amount of rootbeer extract that was used.
Here's the original post if you'd like to check it out:
The recipe is a pretty straight forward cookie and icing combination.
Cookie Ingredients:
1 cup butter, softened
2 cups packed brown sugar
2 eggs
1 cup buttermilk*
1 tsp. root beer extract or concentrate
4 cups flour
1 tsp. baking soda
1 tsp. salt
Frosting Ingredients:
4 cups powdered sugar (or icing sugar)
3/4 cup butter, softened
3 Tbsp. milk
1 tsp. root beer extract or concentrate
Directions:
Preheat oven to 375º.
In a mixing bowl, cream butter and brown sugar. Add eggs, one at a
time, beating well after each addition. Beat in buttermilk and root
beer extract.
Combine dry ingredients; gradually add to creamed mixture.
Drop by tablespoonfuls onto ungreased baking sheets. Bake at 375º for
10-12 minutes or until lightly browned. Remove to wire racks to cool.
In a mixing bowl, combine all frosting ingredients. Beat until smooth.
Frost cooled cookies.
Cost for the ingredients we did not have on hand:
Rootbeer concentrate: $3.28
Baking Soda: $0.58
Butter: $1.68
Total: $5.54
*I do not buy buttermilk. I make it by adding 1 Tablespoon of white vinegar to 1 cup of milk. Stir and let stand for 10 minutes (in the fridge).
Total prep, mixing and baking time: 1 hour 20 minutes
I feel that this recipe is very simple. Mix butter and sugar first - typical of cookies. Add wet ingredients, then dry. Mix until well blended. I used a large soup spoon for dropping the cookies on to the cookie tray, so they were bigger than suggested. The icing was a great confectioner's sugar blend! I used to be pretty bad at making frosting this way, but this exact recipe would work with any flavoring. The top of the icing gets firm but stays soft underneath, which is perfect!
A few things I would like to note are that I made these cookies pretty big and still ended up with 44 cookies. You could easily cut the recipe in half to end up with only a couple dozen. My baking time was a little longer than suggested. I baked two full cookie sheets, one on each rack in the oven. The bottom rack finished in 12 minutes, the top finished just over 13 minutes. Also, the amount of icing is the perfect amount for this many cookies. If you are too generous in the beginning when icing your cookies, you may run out! Finally, my cookies turned out light in color, not brown like the original picture leads you to believe.
Here are photos documenting the process:


Taste and evaluation:
I have solicited the input of my husband on how this baking expedition turned out (he says he doesn't like all sorts of sweet stuff, but he sure does like to help make it disappear!). We tried them with and without the icing, because sometimes things are pretty good both ways.
Without icing:
My Husband: I can taste the rootbeer, but the texture is somewhat alarming because it is incredibly similar to a pancake. The cookie does not have the desired cookie crunch that I feel it should.
Me: Rootbeer flavor is definitely present in the cookie itself. They are a soft, chewy texture and moist. Without icing I feel they would be best paired with a glass of milk or maybe a scoop of ice cream!
With Icing:
Me: I think the cookies are surprisingly light, which may cause you to eat many more than you would if they were very sugary or heavy! The icing is quite sweet, so be careful how much you put on top! Too much would completely overpower the subtle cookie. These would be a good addition to a themed party (a 50’s sock hop, perhaps) or for something different than your average chocolate chip cookie.
Overall:
This recipe is easy to follow and most of the ingredients are common kitchen staples so it would be low cost to prepare. The cookies turn out to be a generous size with plenty to hand out. Since there is milk in the recipe I stored them in the refrigerator, and I have got to say that they are absolutely delightful cold! I would recommend the Six Sisters' Stuff Rootbeer Float cookies.
Subscribe to:
Posts (Atom)